Rockin’ Rio, a quick getaway to Brazil!

In 2016 while I was in Peru, I looked up flights to Brazil thinking I can cross two of the seven wonders of the new world. At the time, the flight to Rio de Janeiro from Lima, Peru was as expensive as flying straight from Washington.  That impression lingered on me and so I deliberately did not plan a trip to Rio in 2017.

83C090EC-8295-4548-8A66-031355340D06

Earlier this year as I started planning my vacation leave and the countries I plan to cross off my list, I thought of Brazil again, looked up the flights and realized they are actually more reasonable now so I hashed a quick 5-day itinerary for the Memorial weekend. The trip was supposed to be another solo trip but at the last minute, a friend decided to tag along and that made the trip even more memorable!

7E7A38CA-1C3C-4ADB-B3DE-777EB9EE28F0

I got to be honest though, traveling with friends makes me wary. There is such a thing as traveling compatibility even between friends and sometimes a good friend ends up not being a good travel buddy. My concerns were alleviated though as soon as I saw my friend Nickia at the airport – she was sporting comfortable, sleeping clothes for our flight just like me!

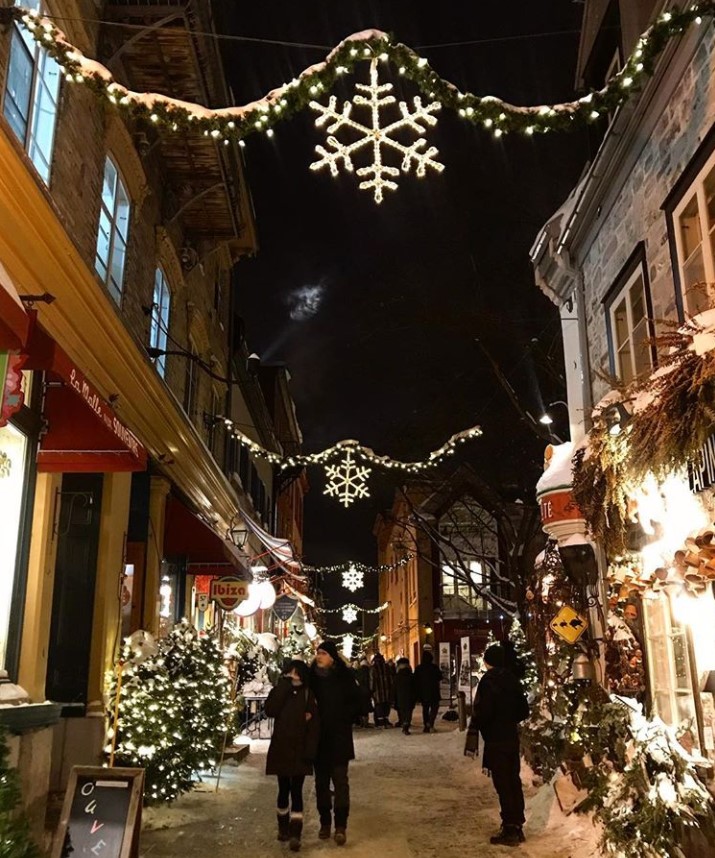
We arrived in Brazil at noon and decided to relax a bit and just walk around the community where our AirBnb is located – Santa Teresa.

33658988_10155812776324132_1269472812347686912_n

Santa Teresa is nestled in central Rio, high at the hilltop showcasing outstanding panoramas of the city below. It charmed me with its bold murals in the neighborhood, cobblestone streets, chic hotels, and various art studios – a fashionable hotspot. It is a relatively safe neighborhood for female travelers especially solo ones (remember I originally planned this as a solo trip).

50721C0F-163E-4544-94A4-07A54E4A7ED8

We spent the afternoon exploring the Parque das Ruinas, and just walking around the neighborhood. Our next couple of days were full so we took this time to rest and prepare for  our adventures tomorrow!

34492563_10155837031669132_1217631436098502656_n

The next day,  Our host Eiya prepared us an awesome breakfast and was kind enough to provide us guides to each significant part of Rio de Janeiro and we used those as reference especially in Santa Teresa.

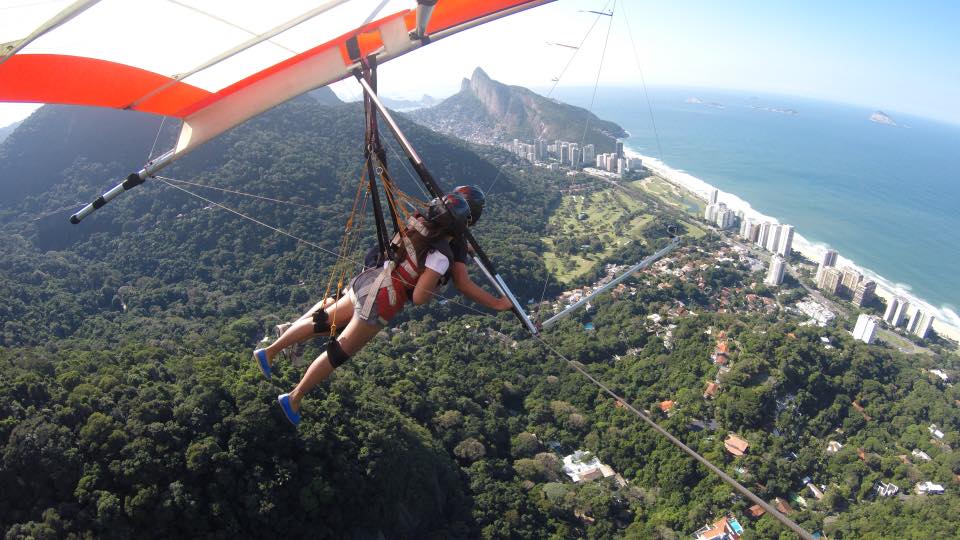
Our first stop was hang gliding from Pedra Bonita Ramp at an altitude of 520 meters, or 1,700 feet, from where we will take-off for an exciting flight over São Conrado with wonderful views of Rio de Janeiro. Now if you have read all my posts until this one, you probably already know I am very adventurous so of course I did not pass a chance to hang glide! I have not done this before so I was both nervous and excited! Nickia on the other hand, is definitely afraid of heights. I tried to push her beyond her comfort zone by signing her up for hang gliding too and let’s just say it validated her fear of heights (oops)!

2F41105D-3EAE-4B2C-BEBF-DD3BF8ED56B0

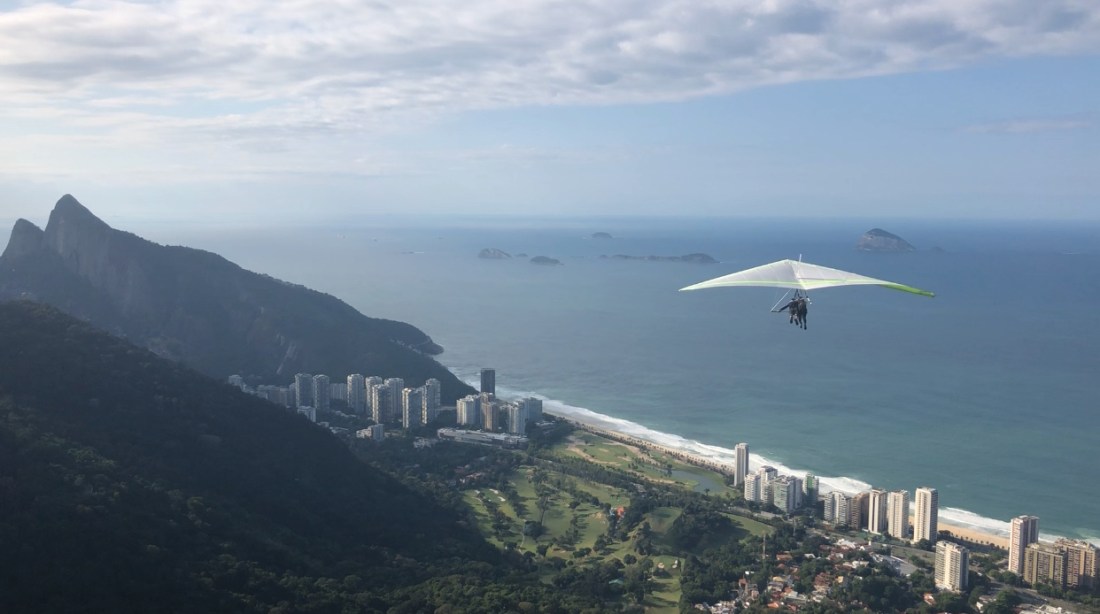
I booked this experience with Paulo base on the reviews and his past experience (he has been doing this since 1986!). Hang gliding is the oldest form of recreational flying so naturally, they have less safety precautions. I almost felt more safe skydiving than doing this! For one, you aren’t wearing a parachute. Second, there is no safety ‘pull’ to get you out of the  glider should it fail, like say fall into the ocean or something.  The idea is pretty straightforward so after calming your heart and accepting that you are really jumping off the side of the mountain in this contraption with your instructor, you should be able to enjoy your flight! I certainly enjoyed mine!!

34479223_10155837031439132_7863438846657036288_n

Afterwards, we went to Ipanema beach for lunch. The water was too cold for swimming so we just hang out at the beach watching guys play soccer and ride the waves. In a few hours, we will be picked up for our Favela tour so it was a short but sweet break.

33618740_10155814922034132_1416377654696738816_n

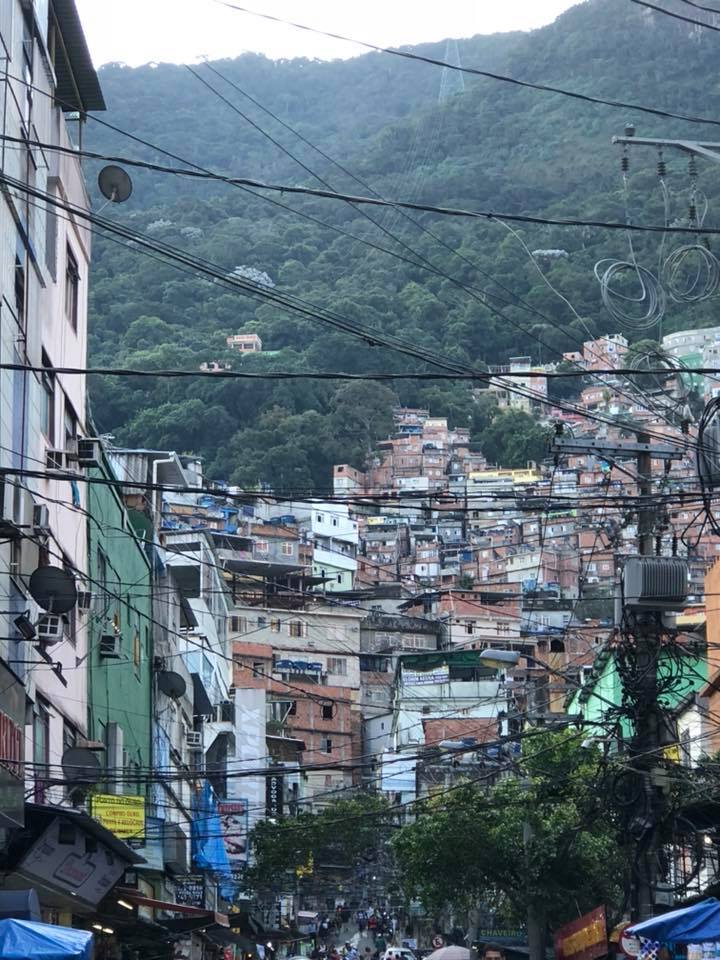
When I was planning this excursion, I wanted to make sure that our Favela tour is not just pointing at the people and their houses as if their everyday lives are entertainment to tourists. I can only imagine how that feels so I looked at  walking tours done by actual residents of the Favela and that would provide a greater insight to the economical and social construct of Favelas without feeling intrusive.  I booked our walking tour at getyourguide.com.  Our tour guide’s name is Carlos, a self taught Favela resident who speaks 4 languages. We started the tour from the top of the Favela Rocinha on the way down. Carlos is gracious, self depreciating, knowledgeable, charming and sensitive.  The tour was very enlightening and definitely one of my most memorable travel experiences to date.

34642243_10155837029124132_8243516724771553280_n34461029_10155837031289132_7987528350283333632_n

Afterwards, Nickia and I went to Pedra do Arpoador to relax and wait for sundown.  It is considered one of the most romantic places to watch the sunset in Rio . It also provides a 360 degree view of the attractions in Rio –  on one side you’ll be able to see Ipanema and Leblon beaches as well as Morro Dois Irmãos (Two Brothers Hill), Corcovado Mountain and Pedra da Gávea (Gávea Rock) behind it. To the other side of Arpoador Rock, you’ll see Copacabana Beach and Sugarloaf Mountain.  It’s very popular so be sure to get there in time or you’ll have a hard time finding a comfortable place to sit and watch the sunset.

34494751_10155837028959132_7198011798186885120_n


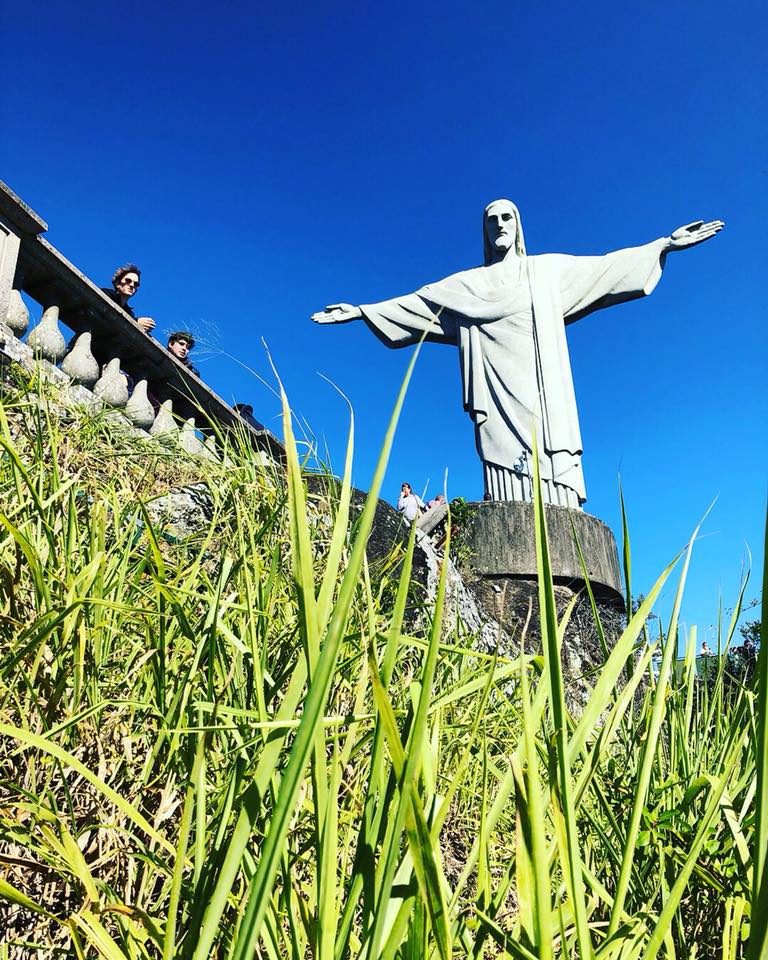
On our 3rd day, we went to visit the famed Cristo Redentor (Chris the Redeemer), the reason I added Brazil to my list.  It is 30 meters tall and is the world’s largest Art Deco sculpture. We took an uber to Cosme Velho and took the tram up the mountain. There are several ways to get to the top but taking the tram is the most scenic (be sure to sit on the RIGHT side for better views!). You can purchase the ticket to the tram in the station via cash or credit card.  The ticket is roundtrip and includes the entrance fee already.

34532909_10155837028654132_3425934801717166080_n

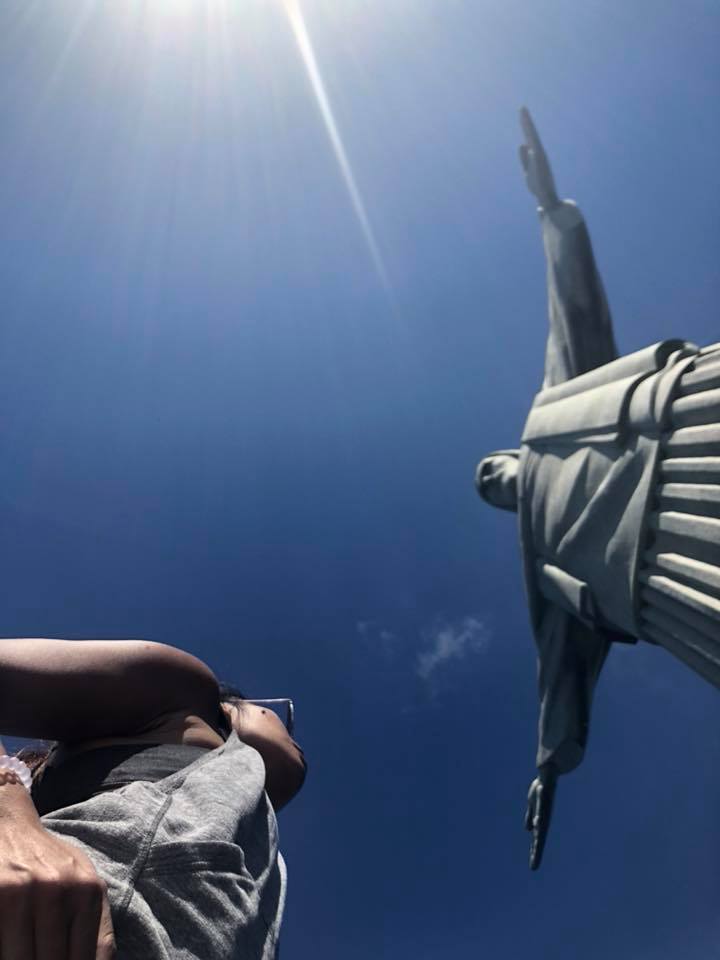
I suggest not booking this ticket in advance because you want to make sure it is not cloudy when you go. Otherwise, you won’t even see the full magnificence of this sculpture! However, whether its cloudy or not, it appears you will never not have anyone in your selfies with Cristo Redentor with the mass of people ALWAYS at the top.  It took us a few minutes (and a lot of maneuvering the crowd) to actually find a spot where we can take good pictures!

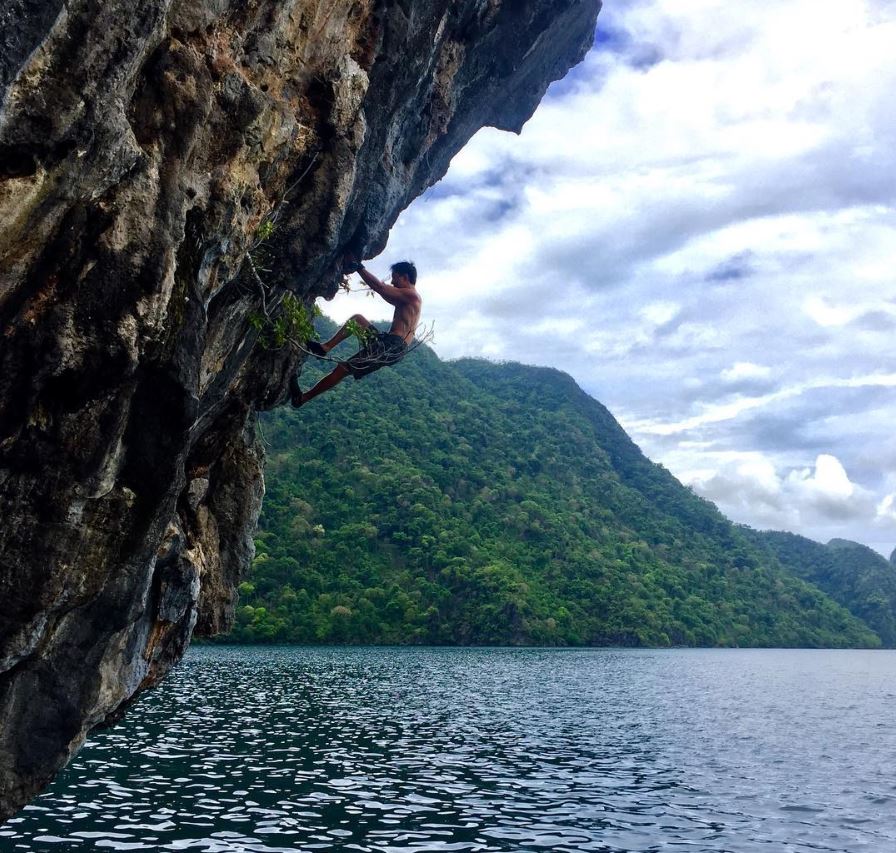
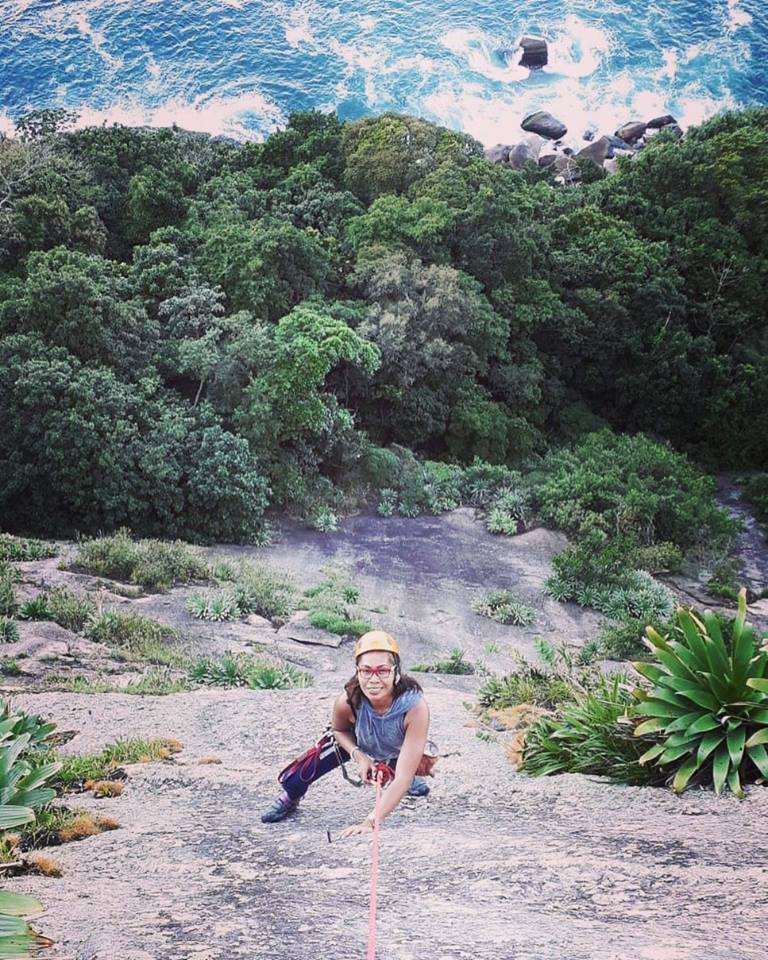
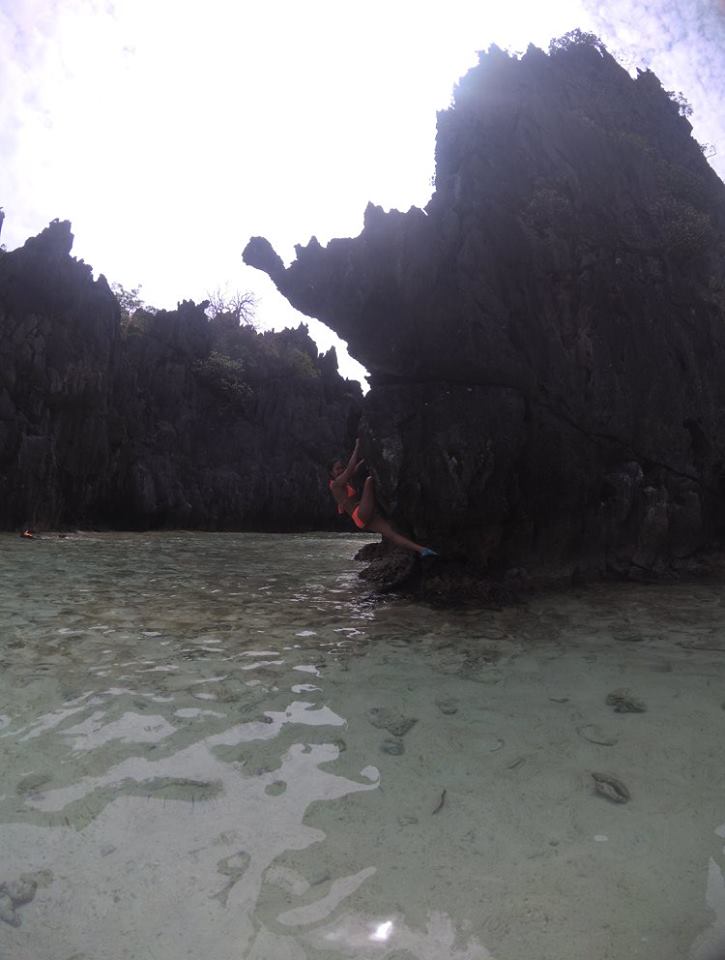
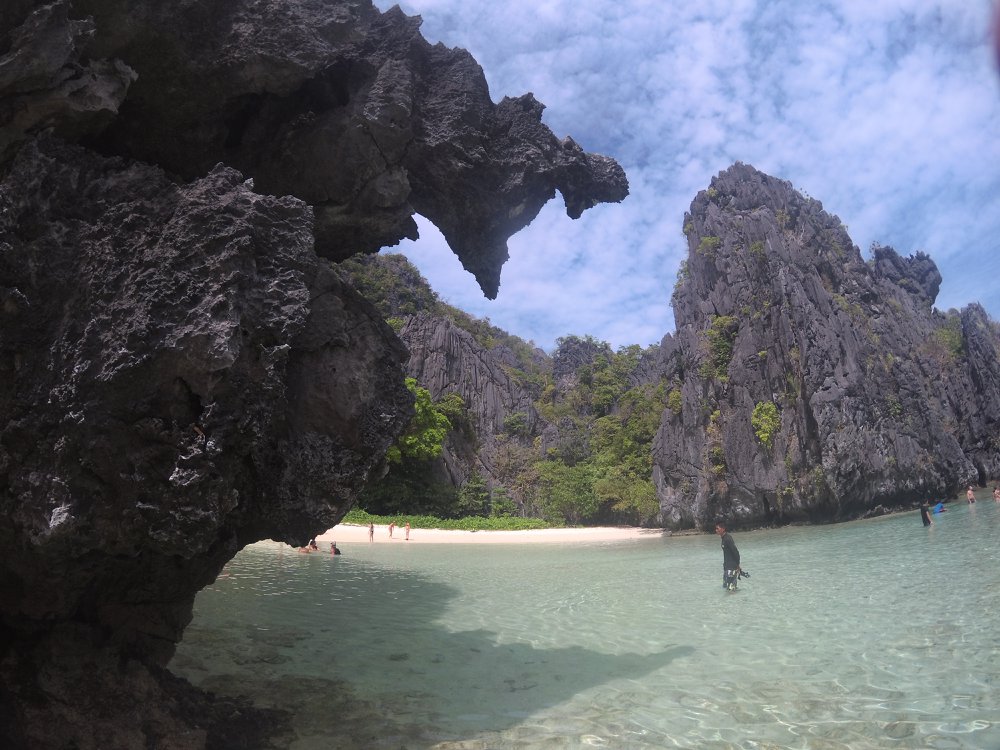
After lunch (by the way, skip the restaurant at the top. It’s trash.), Nickia headed to the beach while I went to Sugarloaf mountain to meet my climbing partner Mingo!! Rio de Janeiro is heaven for rock climbers like me! It appears every mountain I see is climbable.  My goal is to rock climb Cristo Redentor but Mingo thought it would be good for us to do Sugarloaf first since I don’t have a lot of experience climbing outdoors and it ‘s my first time multi-pitch sports climbing (whew, glad I got lead belay/lead climbing certified before this trip!).

I encourage every single rock climbing friends of mine to definitely go with climbinrio.com. Mingo is very friendly, fluent in english and really makes you comfortable that it feels like we’ve been climbing together for years! He takes time to understand your skill set and recommends climbing routes that aligns to your comfort level and experience.


We settled with Coringa with Sao Bento route – This is a nice 100 meter 5.8+  face climb on the south face of Sugarloaf that links up with the regular route on the east face.  From there, we linked with the Costao route and do a mountaneering finish.  This climb made me realize I hate slab climbing lol.

33683910_10155817781609132_106362648882315264_n

At the top, I met with Nickia to watch the sunset and took the cable car down.  The  day after tomorrow, Mingo and I are climbing Cristo Redentor *happy dance*.

I didn’t think our sunset view yesterday could be topped but again, I was proven wrong. I mean just look at this view from Sugarloaf mountain!

49721B9B-E6AA-4095-8F11-61109EFDB540

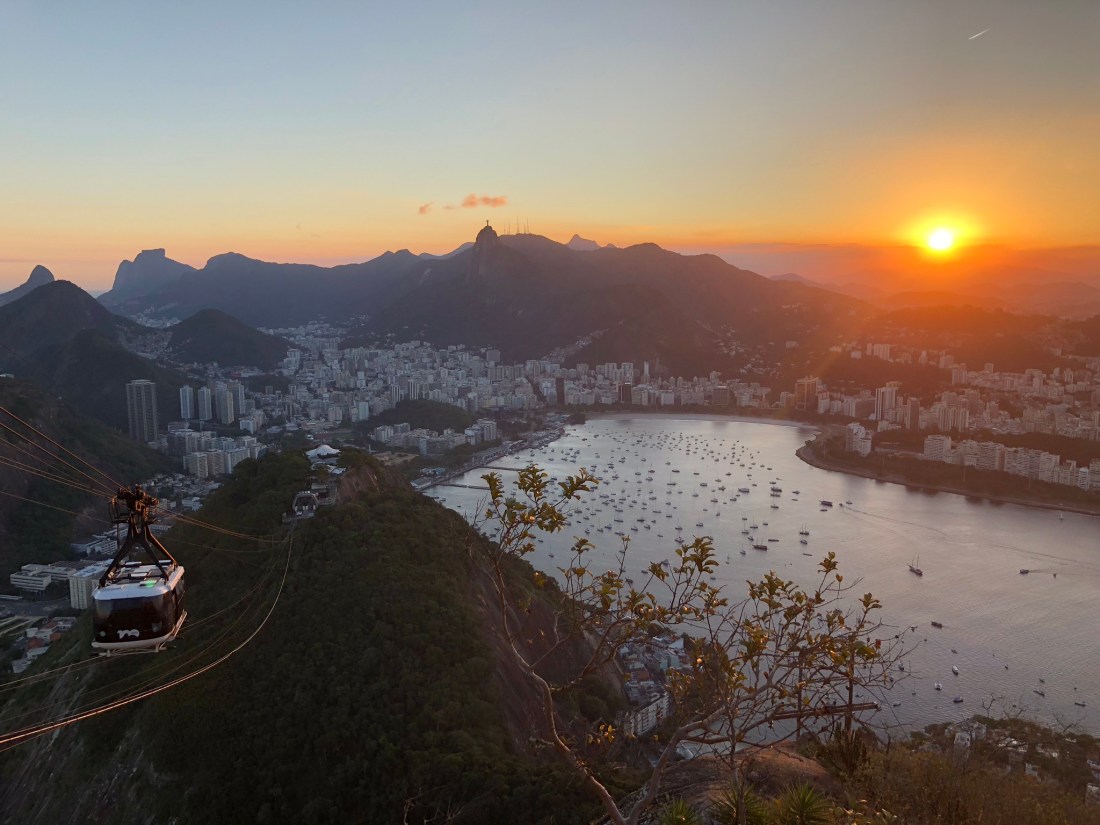
At the foot of the cable car is a nice restaurant facing the sea. It was a full moon and the view was breathtaking. Unfortunately, I was too tired to take good pics! After dinner, we hang out at the secluded beach right outside the restaurant a bit and then stopped by a dance party happening a few steps away before heading back to our place and calling it a day.

On Nickia’s last day, we explored central Rio by making our way to the famed Selaron steps (Escadaria Selaron).  During the 1990s, local artist Jorge Selarón transformed this once average urban utility into a technicolor stairway of brightly colored tile mosaics.

34583192_10155837028234132_1810536926688575488_n

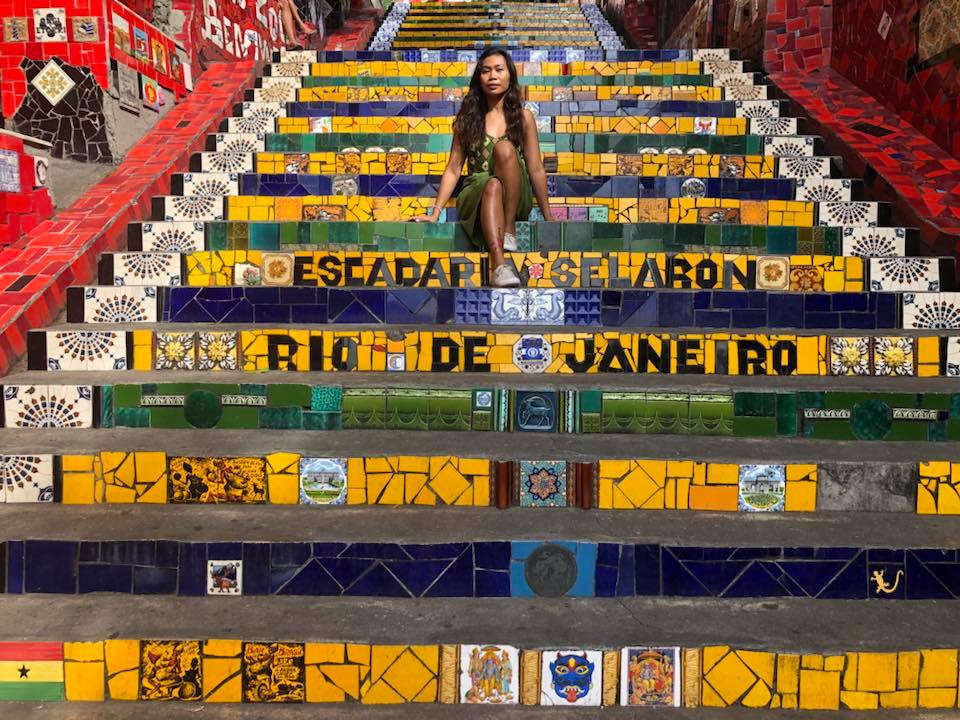
And what would you do when you are surrounded by this much art? You take photoshoots of course!!

34670022_10155837028259132_7576531784288960512_n34181943_10155837028014132_1482267173186437120_n

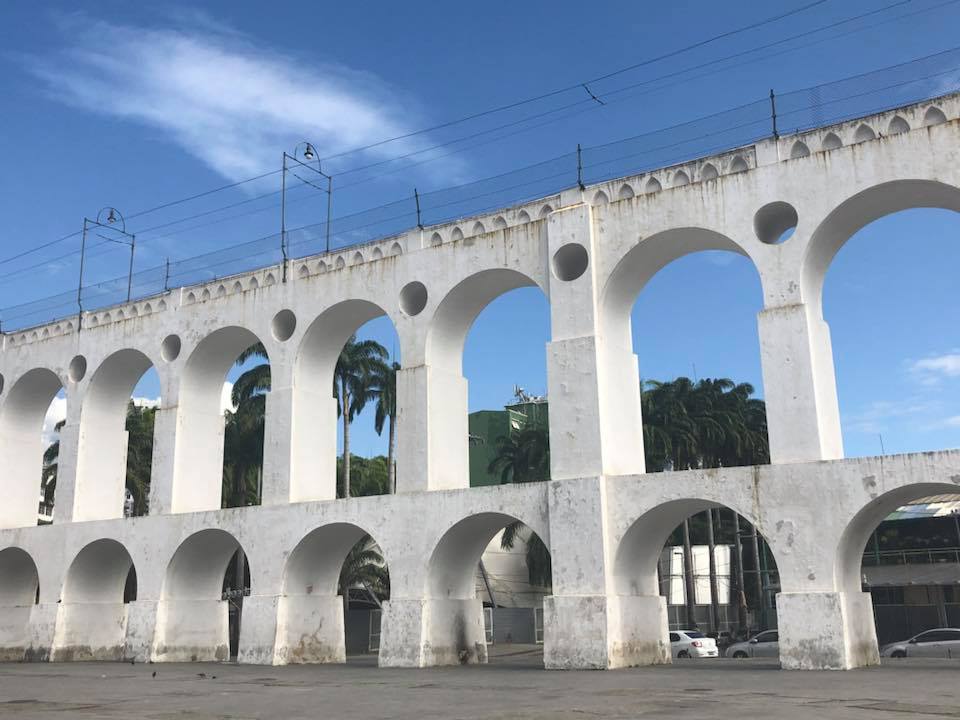
From Selaron steps, we walked a bit to get to Arcos da  Lapa. Since the end of the 19th century the aqueduct serves as a bridge for the Santa Teresa Tramway that connects the city center with the Santa Teresa neighbourhood.  One of the tourists we met at Sugarloaf warned us about this place and they were not wrong. Be careful here and make sure you don’t linger much. Be aware of your surroundings and don’t try ‘exploring’ the small streets around it in hopes of getting a good angle for your picture. Several people have been mugged around here!.

34482966_10155837028199132_6912585713556914176_n

In the afternoon before Nickia’s flight back, we went back to Ipanema beach and walked around the high end shops and restaurants near the beach.

The morning of my flight back, Mingo picked me up early (incidentally, he used to live in the same street as my Airbnb!) to head to Corcovado mountain for our Cristo Redentor ascent.  We parked at the parking lot in the middle of the hike up the mountain, walked for a bit and followed the trail leading to the starting point of what is called the ‘K2’ route.

K2 is a nice aerial climb that covers 120 meters of 5.9+ climbing in 4 pitches on the east face of Corcovado.  This route requires varied techniques (crack, slab, and face climbing), tops out at the Christ the Redeemer statue and offers incredible views of the city. There is a 5.10C/10d crack variation on this route if you want the harder version (I didnt!).

E8B9AEE4-83DC-49F8-83F0-D2225F5CEA3B

It really helped that I was already comfortable climbing with Mingo after we did Sugarloaf so I was less nervous here but damn, the starting point here is higher and the climb is longer.  The view is unparalleled though and so surreal. What a climb!

33898815_10155820737519132_7697814574031962112_n

The bonus was seeing the faces of tourists at the top when we emerged! They were amazed that we climbed it to the top and that made me soo proud of myself! Mingo asked me to do the 5.10+ climb at Sugarloaf (250 meters) and I was SOO tempted by I’m flying back in the afternoon and unfortunately had to decline.

33900783_10155820737689132_2642812412247408640_n

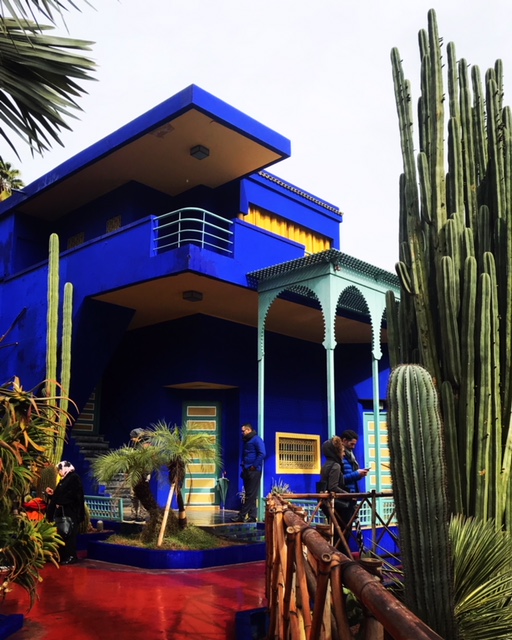
I know I normally don’t visit countries twice and I already said I will make an exception for Morocco. However, for the rockclimbing alone, I am willing to spend a weekend in Rio de Janeiro ANYTIME. So climbing friends, let me know when you are heading to Brazil and I will join you with my harness, climbing shoes and chalk!!


Deep Water Soloing in Coron

Do you have any idea how hard it is to search for local boatmen, tour guides, companies, etc. who knows where you can safely do deep water soloing in Palawan, Philippines? It took me months (!!) sifting through reddit, quora, travel sites, instagram feed, facebook posts, twitter tags! I reached out to posters who seemed to have an idea what I was talking about and I run into dead-ends most of the time. Its truly exhausting work! This is why as soon as I found one, confirmed it in person and did it, I decided I definitely should put this in my blog so those who are looking for it do not have to do the same exhausting research I had to do! For my rock climbing friends, I hope this helps you guys out!

Deep Water Soloing

According to wikipedia, Deep Water Soloing is “is a form of solo rock climbing that relies solely upon the presence of water at the base of a climb to protect against injury from falls from the generally high-difficulty routes“. Also known as ‘psycobloc’, it is basically climbing with just your shoes and chalk and jumping to a comfortable height down to the water.  Easier said than done!! If you are afraid of heights OR deep water (or both!), this is definitely one that you should NOT do.

Now all of these sound exciting and good but of course, as any sports, safety is paramount. A lot of these guidelines are pretty self explanatory but I would list them anyway.

  • Never go alone. If you get into trouble, at least someone else is there to help you out of the water.
  • Be sure you know how to swim. Remember that you have to swim back to the boat after the jump (duh) and you may have to weather the water currents.
  • Be wary of the phenomenon known as Cold Water Shock, which is a real danger in water below 15°C.
  • Land in water, feet first. I assume if you sign up to do DWS, you already know how to properly jump into the water.
  • Scout the location – NOT ALL CLIFFS, ROCK OVERHANGS SAFE FOR CLIMBING ARE SAFE FOR JUMPING. Make sure there are no obstructions under the water. Check the tide times.
  • Be prepared. Bring your first aid kit if you have it.

El Nido or Coron

El Nido

Now that we have covered the basics of DWS, let’s talk about the experience.  During my research of places in the Philippines for this sport, most of the links brought me to this video.

Deep Water Solo

I was so happy because that’s where I was headed and thought it would be easy to find guides to bring me to these rocks since I’m a local. NOPE. First of all, I have not encountered any adventure excursion, a guide OR a boatman who was familiar with the sport. I showed the video and everyone was like, “Oh I know that place! For a fee, I can show you that rock!”. Umn, no thanks! Be wary of these people because they are NOT climbers – which means they do not know whether that rock is climbable, the tide condition, the climb grade, etc. They literally only know the ROCK and will bring you there. That is a disaster waiting to happen.

28516347_10155602792359132_5458804258217306764_o

Afterwards, I reached out to a blog post that showed pictures of DWS in El Nido. Unfortunately, it was taken 4 years ago and these are just tourists who rented a kayak and tried looking for rocks to DWS on their own. Still, I kept my hopes up that they know someone who could lead me to the places they climbed. They responded after a couple of days (im surprised they did actually!) and my fears were confirmed – the pictures were definitely in El Nido. What islands, they dont remember. How to get there other than kayak from where they were at the time, they cant say.  It was another dead end. In addition they said that the rocks in El Nido they climbed were not ideal – too sharp, , the water too shallow. Like me, they saw the video but does not know how to get to those rocks.

Since I was in El Nido already, I figured I should try the rocks myself. Just the ones right beside the beach which looks like the types of rocks all over the island.

28167113_10155602836914132_7926876034085543700_n

yeah, NO.

I am not saying there are no rocks you can climb as I am sure there are. They are just not established and only few people know which person to ask. It seems this group found a reliable guide.

I mean look at these rocks.

28423971_10155602833834132_3541777867636610568_o

Coron

Finally in Coron, I managed to follow a lead from a very obscure, old post to which Ted, the poster, introduced me to his partner, Leroy.  The latter owns his boat and brings rock climbers to locations previously mapped by a group of foreign and local climbers as deep water solo ready.  I called him and scheduled an outing at the rocks. Since I was pressed for time, we decided to only do half day of DWS. I figured I’ll be too tired anyway to do it for the whole day. We settled on the price and on the day of the climbing, he picked me up from where I was staying in town.

28828262_10155638142314132_1169609385609840041_oNote: There are some tour companies who offer ‘rock climbing’ in town. I do not trust them as much since they dont even know the rock climbing grades when I asked them about it. 

Coron has the potential to be the next deep water solo destination in Asia (right now the hub is around Railay beach in Thailand). Unfortunately, some of the great climbing areas are restricted. They are owned by the indigenous tribes in Coron and therefore not accessible to public. I tried to encourage Leroy to expand this activity because he basically has NO competition. Unfortunately, because gears are expensive (ropes, harnesses, shoes,) unless somebody sponsors him, it cant be done. I told him I’ll sponsor him as soon as I won the lottery! Until then, I will just spread the word and bring him clients (no fee or any sort of percentage for me of course!). I hope to return to Coron in the future and see his DWS/Rock climbing business successful!

There are only a few DWS routes in Coron, at least the ones accessible to us. Two of them are about 5.11c with variations up to 5.13 – waaaaaay beyond my league!  This leaves me with one option  – this rock!

29178263_10155638224764132_6829525951671091321_n

I was told this is where he brings ‘beginners’. I mean I am a beginner for DWS but I have been climbing and I’ll tell you now, this is NOT a beginner route! I would say this is hard 5.10b mostly because it is inclined the rest of the way with only a few pockets of rocks where you can comfortably rest.  Seeing as I have a fear of deep water, naturally this activity sent my heart racing. I swear I spent more minutes calming my heart instead of climbing! I would climb fine and would see the water and then I either have to calm my heart before proceeding with the climb or jump down because my palms are so sweaty from nerves!

29104011_10155638222399132_6982938535195299075_n

Leroy actually gave me some good advice – He said it doesnt matter how high you can climb if you cant jump from that height. This is true. This could be an easy breezy climb but there is no way down but jump. So if you are not comfortable jumping from 30 feet, well dont climb that high!

I wish I can say I conquered this rock and made it to the top lol. I finished at maybe 20 feet. My head was so dizzy with the height I just have to jump.  Because I can only focus on either the climb or the jump, I started by mapping out the holds. I climbed the first 5 feet, familiarizing my self with the holds and foot placement, then jumping down to the waters and swimming back to the boat. Afterwards, I would do the next 5 feet and so on. That worked well for me although I assume for more experienced climbers, they dont need to ‘map’ it more than 5 times.


This video was the only one I have and even then, it only shows one of my attempts to map it. It’s not a lot but I was so proud of myself after this excursion haha! For someone who feared heights AND deep water before, this is a success for me!

I recommended Leroy to another tourist who found my post in reddit and his picture is much cooler than mine so I’m posting it below.

Capture

Anyway, if you would like to contact Leroy, please message me and I will make the introduction and send you his contact information. Happy climbing!!

P.S. Obviously Leroy does not have any climbing gear so make sure you bring your own shoes and chalk. There is also no shop in Coron where you can rent them out.


Coron, a must-see island in the Philippines

I cannot say Coron is the best Philippine island ever because admittedly, I have not explored my own country as much as want to [its 8,500 miles away :(]. However, I can say that Coron is as beautiful as everyone said it is.  Wildly regarded by travel bloggers as one of the best islands in the country, its pristine beaches, clear waters, beautiful corals, and friendly people makes foreigners and locals alike flock to the island all year round.

29100995_10155638222199132_2004328002853780173_n

Despite how popular it has become in recent years, somehow Coron still retained its “small island” feeling – the carinderia’s (small restaurant/take out food for locals), botica’s (pharmacy stores), BBQ at night, and most notably, the lack of food chains.  Coron WAS El Nido before it became too popular and too crowded.

29103378_10155638222284132_7639518533682848939_n

Isaw (chicken intestines), my favorite street food!

I planned to go to Coron originally for two things – Kitesurfing and Deep Water Soloing (DWS). Unfortunately, the kite season ended early this year and so I had to change plans at the last minute.  I decided to use that time to get PADI certified and what better place to do it than Coron?

kite_camp_bonfire

Sidenote: For Kitesurfing, I highly recommend Kite Camp 250K – it is a paradise for kitesurfers. An island set in the middle of the Calamianes group of islands, this camp is surrounded by favorable wind and like most of the islands of Palawan, surrounded by clear waters.  They have instructors, equipment for rent, paddle boards, and anything else you need for your water adventure. The island has its own chef and the accommodations include the meals for the duration of your stay. Check them out!

Getting there

You can fly to Busuanga airport directly or if you are coming from El Nido like me, you can take the ferry. I used Montenegro fast ferry since it is faster and more convenient for me. A one-way ticket costs about $35 per person and you can buy at their El Nido office. As long as you buy the ticket the day before you plan to leave El Nido, you should have no problem securing a seat.

As soon as I arrived in Coron, I head out to the nearest carinderia to get the ‘local deets’ while eating lunch. Filipinos are very well know for their friendliness and hospitality. The girl who served me and her sister gave me good tips such as where it is cheapest to stay, where to get the best food and which tour company I should take. From there, I took a tricycle to the town proper to find my accommodations.  If you are traveling solo or with a small group, you will find plenty of accommodations in town without needing to reserve the hostel/airbnb/hotel in advance. I decided to stay at Zuric Inn and after booking my island tour for the next day, I called it a day and stayed in my room to get some much needed rest.

The island tour I took is the ‘Ultimate Island Tour” (very dramatic name, I know!) that includes Siete Picados, Kayangan Lake, Twin lagoon, Skeleton wreck,  CYC beach and Barracuda lake. This took us the whole day and the package included hotel pick up and lunch.  You can rent some snorkeling gear before heading to the boat (provided by the tour operator) or bring your own. Lather up your skin with TONS of sunscreen (SPF 100). It’s definitely hot out there!


Siete Picados is a small island with beautiful coral reefs teaming with fishes that you can see from the boat. We spent about half an hour here just snorkeling and enjoying its pristine, clear, waters.

28698658_10155637958799132_7718078516554120329_o

Then we head to Kayangan Lake known as one of the clearest lakes in the Philippines. Right now, you are not allowed to jump into the lake without a life vest after a drunk tourist drowned while free-diving (shame!). Still, with the tour guide watching me and with his permission, I took off my life vest and dove for a bit! 😉

29132978_10155638222279132_3805397714875773720_n

I skipped the skeleton wreck since I will be scuba diving there anyway the next day. For lunch, we head to CYC beach where they spread out the food for us to feast!

Afterwards,  we head to the twin lagoons – two breathtaking shallow saltwater lagoons with stunning water and separated by a small opening in the rocks where you need to swim under.  Unfortunately, there was a big group doing some team building activities while we were there so I didn’t get to take a lot of pictures. I was able to dive and swim there for a bit though!

DCIM101GOPROGOPR9612.

Before we cap the tour, we went to Barracuda lake. Barracuda Lake is a must-go for scuba divers because of its unique mix of fresh water and salt water. Surrounded by lime stones, the lagoon was formed by a karst sink-hole which has separated the lake from the open ocean. It is volcanic activity beneath the surface that heats up the salt water trapped inside. It is less popular than Kayangan lake and therefore less tourists! We had the whole lake for ourselves for almost an hour!

28953859_10155637962034132_7427629638704341303_o


The next day, I signed up for a scuba diving ‘discovery’ lesson (discover scuba diving + 1 fun dive) with Coron Divers.  This is my first time scuba diving so I was very cautious and downright frightened.  Deep water where I cannot see the bottom scares me the most. I figured the best way to get over it is to confront it head-on.  The team at Coron Divers was very understanding of my situation and made sure I was comfortable the whole time. I dove with Kuya Arni (‘Big brother’ Arni) who is the scuba dive master and the most patient instructor ever hah! He helped me manage my mini panic attacks and assured me of my safety while we were underwater.  For this day, we went to Siete Picados and then explored the East Tangat Gunboat wreck.

29101685_10155638222409132_8299345905418763156_n

During World War II, US helldiver bombers and hellcat fighters sunk the Japanese supply fleet hiding among Coron islands below. As a result, Coron now boasts the best wreck diving in Southeast Asia. Each wreck has its own special characteristics, but on the whole they are big, mostly intact, within reasonable diving depth and full of amazing artifacts. These wrecks were what we explored when I decided to continue onto the lessons and complete my PADI certification.

28827144_10155637982889132_8409363095096756628_o

On my last day, I thought about going for another scuba diving session (maybe at Barracuda lake) in the afternoon but since I had to fly out the next day, it is just safer not to. For single dives, it is recommended to wait at least 12 hours before flying (Oh yes, this was one of the questions in the exam I took to get PADI certified!).

I will post a separate blog for the DWS attempt I did in Coron. As a newbie rock climber and doing deep water solo for the first time, the experience is quite special to me and I would like to put more time and attention with that post.  Ciao!


Time stops in Cuba

Cuba is that one country where every American friend of mine wants to go but thinks they can’t go.  Just to clarify this myth right now – yes you can and I encourage you to! Cuba is a timeless beauty. From the classic cars in Havana you see in travel pics, the spanish colonial architecture, its mesmerizing cuban music, to the heartwarming courtesy of its people. It is one trip you definitely should add to your bucket list.

capitolyo3

Getting to Cuba

The US travel policy to Cuba did not affect me since I have my Philippine passport. I still had to get a visa from its embassy in Washington DC though. The visa process in summary was definitely frustrating because of lack of clear process, the wait time and the confusion regarding the applications.  Thankfully, I received my visa two weeks before my intended travel.

One of my friends sits as a board member of Cuba Skate. The Cuba Skate mission is threefold: bring skateboarding materials to the Cuban youth, renovate local skateparks, and create self-sufficiency for a group of skaters that rely tremendously on outside help. I volunteered to bring skateboarding supplies to Cuba and assist in any projects they had in Havana at the time.  Miles, Cuba Skate’s Executive Director put me in contact  with Tio Pepe (I love you Tio Pepe!) who hosted me during my trip.  If you want to add some volunteering work to your Cuba trip, I encourage you to reach out to Cuba Skate!

cubaskate

You cannot get Cuban Convertible Pesos (CUC) outside of Cuba (1USD = 1CUC; crazy I know!). I am not sure if you can order it in advance from your US bank but since I didn’t need wads of cash (I was only there for 5 days), I opted to just get it in Cuba. Cuba has 2 currencies – the CUC and CUP.   Not all establishments accept CUP (the luxury ones) so its best to have tons of CUC. However, it is useful to have a few CUP for buying small items in the market, and for public transportation.  Establishments do not accept US credit cards so be sure to have enough cash for your travel. You can exchange your US dollar at banks, hotels and the state currency exchange offices (known as CADECA).

Exploring Havana, Vedado, Varadero and San Diego de los Baños

Tio Pepe’s home is in Vedado. Looking back, this could not have been a better choice. Vedado is mostly residential neighborhood west of Old Havana. When it was developed in the mid-1850’s, Its streets were set up like a grid  with numbers and letters instead of names making it easier to navigate for outsiders. The neighborhood has also become an important hub of contemporary Cuban culture.  I went to local restaurants for dinner (cheaper and tastier than the restaurants that cater to foreigners!), stocked up on bottled water, sip my daiquiris and drank my coffee for less than 15CUC a day. Btw, Vedado is very safe. There were several times I walked at night after dinner and never felt unsafe.

pepe

(The best cuban coffee I had was definitely the home-made one made by Tio Pepe!)

The taxi from the airport is around 20-25CUC to Vedado. There is no uber in the area. You may also rent a classic car from the airport to drive you to your hotel but of course that is pricier.

One of the challenges I had traveling to Cuba is the language barrier. While I understand certain spanish words, I don’t know enough to converse in spanish! Tio Pepe does not speak english and without Wi-Fi (there is a public wifi btw which I will mention later) and my T-Mobile roaming unavailable, we only have the english-spanish dictionary to help us communicate! I took the time to relax on my first day and get to know Tio Pepe and his family. It was very hot and humid so I wasn’t in a hurry to explore the city.

The next day, I resolved to explore Havana Vieja (Old Havana). Let me explain to you how hot and humid that day was – as soon as I exited my room after putting on my make-up, I started getting teary-eyed. It was very painful and I was exploring Old Havana in tears. I can’t read the signs and I cant take off my shades. It turned out my foundation melted and some of them went to my eyes. The next day, I tried to just put on a moisturizing lotion for my face – same thing happened. So on my third day, I didn’t put ANYTHING on my face. It was THAT humid. Anyway, enough of that. On to Havana Vieja!

You can take a cab from Vedado to Havana Vieja for 20CUC OR you can just flag a colectivo, a shared cab, for 1CUC. This is a no-brainer.  You can flag a colectivo anywhere. There is no specific waiting area and they provide reasonable change.

My first stop was the Capitolyo. Now this is the classic view I was talking about!

capitolyo2

I walked around for a bit to find a good view of the whole plaza and was told I should head to Hotel Saratoga’s rooftop for the view I’m looking for. The rooftop is accessible to the public and there is a pool (I should’ve brought my swimsuit!). The view indeed showed the whole plaza and perfect for my one polaroid selfie (I take at least 1 for every country for my collection)!

capitolyo

Afterwards, I walked to the famed El Floridita de Cuba famous for its daiquiris and for being Ernest Hemingway’s favorite hangout place in Havana. I must say I had high expectations of their daiquiri’s and left disappointed.

floridiana

From there, I went to the National Museum of Fine Arts of Havana (Museo Nacional de Bellas Artes de La Habana) to cool off a bit and then to the Museum of the Revolution, a former Presidential Palace. Behind it is the Granma Memorial, the yacht which took Che Guevarra,  and Fidel Castro among others from Mexico to Cuba for the revolution.  If you know me, you know how I fond I am with museums so its no surprise that I spent a lot of time in these two.

21150129_10155133847189132_5603776143024622846_n

After grabbing a quick lunch, I headed to my next destinations – the Plaza de la Catedral and Plaza de Armas – the latter is the center of cultural hub in Old Havana.. Old cobblestone streets, fine architecture, cafe’s shady gardens. I stayed here the rest of the afternoon doing nothing but people watching and drinking my daiquiris #noregrets.

capitolyo4

The next day, I planned to explore the Castillo’s in Havana but it rained so hard that morning that Tio Pepe and I decided to just stay indoors for a bit. This by far, was the most fun I have ever had! Tio Pepe brought out his musical instruments (he is a music professor), turned on the stereo, brought Cuban rum and after a quick run to a local produce store, we were set! I will this video speak for itself.

pepe2


The rain stopped after awhile so I went and explored one of the nearby parks in the area – the John Lennon park. Now why is there a tribute to John Lennon here when he is not even Cuban you say? Tio Pepe explained to me that they admire his open views of the world. I  don’t know what that means exactly LOL.

park

There was still a few hours before dark so I asked Tio Pepe’s friend to drive me to Fusterlandia.  The taxi would cost me just as much so renting a car out was just more convenient.  Fusterlandia is located in the district of Jaimanitas, outside of Havana and named after the artist Jose Fuster. He converted this seemingly depressed neighborhood to a work of art. The art continues to expand and spread.  Its colorful tiles and artworks really give you a psychedelic experience.  Of course as soon as we reached Fusterlandia, it started raining again!

fustarlandia

That night, we explored the streets of Malecon. It was so amazing how Tio Pepe and I talked for more than hour while walking with us barely knowing each other’s language HAH! The walk was very calming, the seaside full of lovers, friends and locals fishing. I love scenes like this when I feel very immersed with the local scene.  On the way back, we walked home and stopped by Fabrica De Arte Cubano (FAC) 

fac

This is THE hip place to be – a venue for live music, art expos and fashion shows.  It was a cooking oil factory converted by Afro-Cuban musician X-Alonso where you can mingle with artists, musicians and locals alike over coffee and cocktails. Unfortunately, lately it is also packed by tourists. That night, I saw more tourists on the line than locals.  I’m no longer young and it was already 10pm – almost my bedtime (oh yes I sleep early) so I didn’t go in. I highly recommend you go though if you are into these things.

I woke up early the next day to head to Varadero where I hoped the winds were favorable enough to be able to kitesurf for a few hours.  You can take the bus (Viazul) or get a taxi from Havana to Varadero.  There are limited departures (i think only 4 a day) so be mindful of that when considering the bus. The bus is cheaper obviously, around 10CUC. For taxi, you can find a few people also heading there from Havana who can share the ride with you. Usually, its around 80CUC one way. While you don’t need to worry about departure times with the taxi, you run the risk of these old cars breaking down on the drive to and from Varadero.


Unfortunately for me,  there wasn’t enough wind so no kitesurfing. Instead, I spent the day lounging by the beach. Not a bad way to spend my day actually! Be mindful that there is a portion of the beach for locals and one for travelers. The ones for locals are free and accessible of course but as you would expect, very crowded.

varadero

21122586_10155133842904132_1661359581114431446_o

On my last day, I went back to Havana Vieja to meet the group heading to San Diego de los Baños for the “Life in the Countryside” experience I booked through Airbnb.  After breakfast, we hopped into their classic cars and traveled about 2 hours to reach our destination. The trip itself was very insightful. Our guides were both proficient in English and are University students studying Economics. There was a lot of talk about Cuba’s history, their currency, and what drives their economy. For that alone, the trip to me was worth it!

21151661_10155133847644132_8384000325729088367_n

We were met warmly by the family hosting us.  They make their own coffee and owns several domestic animals.  Its a glimpse of the life in the countryside and reminded me much of my own childhood in the Philippines. We trekked for a few minutes to a small cave that we explored for a bit and then we headed down to the river to take a quick swim. Since it was raining the day before, the river is a bit muddy but definitely not dirty.  Our guides brought some guava flavored rum for us to share while swimming and well, I may have had a few ‘coconut glasses’. It was so tasty! We capped the day with a lunch provided by our host family and made our merry way back to Havana (and then Vedado for me).

aday

Since this was my last night, I asked Tio Pepe to buy me some cigars and rum to bring home.  He got me some really cheap ones! Yay!

IMG_2888

The next day, Tio Pepe’s friend drove me to the airport and since you cannot exchange CUC or CUP outside of Cuba, I used my remaining cash to get myself some food inside the airport. There aren’t a lot of choices there so I recommend eating before heading to the airport.

Aside from the classical beauty of Cuba, the warmth and friendliness of its people, and the outstanding cigar and rum, this trip is memorable to me because for the first time, I completely took myself offline. No internet for the whole trip. This was intentional because if I want to, I can purchase Wi-Fi access that I can use in public parks and tourist areas. This was my chance to disconnect and really immerse myself to the experience. No instagram stories, no facebook posts, no work emails. As much as I want to do that whenever I travel, sometimes it isn’t possible. I cherish this trip more because of that.


Winter Wonderland (4 days in Quebec)

I’m not gonna lie – Old Town Quebec is included in my bucket list because I heard great many things about their food, and of course it didn’t disappoint! It is also the only fortified city north of  Mexico,  a UNESCO world heritage, and during the winter holidays, it looks like a Christmas postcard with its cobblestone streets, church spires and the towering castle – Chateau Frontenac by the river!

My trip was only to the Old Town and the Ice hotel outside of town so 4 days was enough for me. I chose an Airbnb within walking distance of Rue St-Jean so I can just walk around to all the places I want to check out.  My choice of accommodation depends on what my mode of transportation is at that city/country.

I arrived in Quebec at night which was fine since I do not plan to go anywhere else that day anyway. Bank of America has a partner bank in Canada so all I did was use the ATM at the airport to get canadian dollars and I’m set!

Because I wanted to experience Quebec city in all its winter glory, I went right after Christmas. That meant I had to endure the freezing weather (-28F at the time of my arrival!!).  If you plan to go to Quebec city in winter, please layer up!! I had 5 layers and while it was a struggle to take my gloves off every time I want to take a decent photo, IT WAS WORTH IT.

In the morning, I started my adventure at 10am (I know, its late!) by having a heavy breakfast at Café au Bonnet d’Âne along Rue St. Jean.  If you are a heavy coffee drinker like me, this is the place to be. Look at how big their cups are!

8

After coffee, I walked up to The Plaines of Abraham. Unfortunately, it was covered in heavy snow so I wasn’t able to walk towards the view of the St. Lawrence river.  A few more blocks and I get to the Observatoire de la Capitale which showcases the view of the Old Town and the town across the river. It opens at 10am and since it was particularly cold that day, there was no line at all.

2

(The view from the Observatory)

From the top, I can see the Chateau Frontenac, the Parliament building and the walls of the city.  It wasn’t raining or snowing but it was so… gray.  As soon as the sun starts to peek, I walked towards the Chateau hoping I can get a decent picture and boy did I get one!

3

For coffee junkies like me, don’t worry there is a Starbucks right at the hotel so you can get your hot chocolate or a cup of latte to keep you warm ;).

The Notre-Dame cathedral is only a few minutes walk from the Chateau and stands on the same location since 1647.   I visited the church but decided not to pay $5 to see the crypts.

4

The next day, I walked along Rue St. Jean towards the chateau for my brunch at Chez Boulay.  You need a reservation for this restaurant but since I am dining solo, I didnt need a reservation.  I ordered the duck confit and OMG, foodgasm! This is what I came here for!!

5

Of course no trip to Old Town Quebec is complete without riding the Toboggan slide (build in 1884). The slide starts from the top of the Terrasse Dufferin, a terrace that wraps around the chateau and provides a good view of the town across the St. Lawrence river.

1

Next in my to-go list is Petit Champlain, a narrow street right below the chateau that transforms as a picturesque holiday background for pictures during the holidays.  When I planned this trip,  I always knew it will be during the holidays specifically so I can take these photos (second pic is Place Royal).

6711

For dinner, I made a reservation at Aux Anciens Canadiens located at the historic Jacquet House, which dates from 1676, the oldest house in Quebec. The restaurant specializes in Québécois specialties served by waitstaff in historic garb.  The food was definitely interesting but I realized I prefer the modern take and menu in Chez Boulay.  You would need a reservation for this place since this is pretty popular with tourists.

The next day, I resolved to find the best coffee in town which brought me to Cantook Micro Torrefaction. The selection of beans, the simplicity of the brews, the aroma of freshly roasted coffee…. you definitely have to try this place out!

10

Since this was my last day, I took it easy in the walking and booked myself a tour of the city via Tours Du Vieux. The tour includes a quick historical tour of Old Town Quebec and a ride to and from Hotel de Glace – the famous ice hotel.  The tour costs $55 and includes the entrance to the hotel.

9

At the time of my travel, the rooms weren’t opened yet (not that I would book one myself!) but the bar and the ‘chapel’ were open for tourists. The drinks were of course overpriced (around $8 – $11 per small drink) and served in this ice glass. So cool (pun intended)!

12

It was three full days and just enough time to explore Old Town Quebec.  As a solo female traveler, I felt safe walking around the town even at night. I don’t speak french but everyone I met speaks english anyway. I used my trusty maps.me of Quebec to guide me as I walk from one attraction to the other.  The food is amazing, the views transport you to the early 1700’s with all the architecture, and the people are friendly. I truly enjoyed this trip and even though I had to enter a store/restaurant every few blocks to warm myself (even with 4 layers of clothes), the walk itself was very pleasant.

I highly recommend you to visit during the holidays and if you can, time it at the winter festival (every January). You will thank me for it ;).


The Land of Ice and Fire (6 days in Iceland)

I looked up photos of Iceland before and I thought it was unreal. I resolved to see it in person and once I did, I still cant believe it was real! The scenery was everything – the lava fields, majestic ice-capped mountains, glacier lagoons, lava tunnels, I can fangirl about Iceland all day!

One of the main reasons I wanted to go to Iceland was to see the Northern Lights.  During my research, I was told the best time to see it is in October (it’s visible between September and April).  In order to see the beautiful northern lights, first the sky must be clear and second, using this website, the aurora forecast (solar activity)  needs to be greater than 1. The higher it is, the better the chance of seeing the lights. Obviously, you would better see if if there is less pollution and also when the night is darker (so maybe not during full moon).

I was hoping to see it but I was determined to enjoy my time in Iceland regardless. For this trip, my friend Jeannette decided to join me.  We worked together to decide what’s our absolute ‘must-see’ and from there, she prepared a detailed itinerary.

First we booked our flights through WOW Air which is one of the budget airlines to go to Iceland and the rest of Europe.  I live in Washington, DC. WOW Air flies from Baltimore Airport so for me, I had to take a short train to Baltimore first.  Please be warned – it is a cheap flight for a reason – the legroom is small, there is no entertainment of food (so dont forget to bring some snacks with you at the plane!) and they REALLY measure the size of your carry-on luggage. If it doesn’t fit, they will definitely insist that you check it in. Fitting all my winter coats, warmers, scarves, etc. in my carry-on bag was a feat! I felt like Doraemon (lol only Anime fans would get that reference!).

There are several ways to get around Iceland. The most popular is of course renting your own car.  We decided for us, that is the best choice. Be careful to read the fine print when you rent the car and make sure the miles are ‘unlimited’. There is a lot of driving around to go to the places mentioned in this post.  There is a lot of gasoline stations so you dont need to worry about running out of gas in the middle of nowhere. As is ANYTHING in Iceland except the flights, gas is expensive. However, there is ONE Costco in Reykjavic so I suggest you fill up your tank there as often as you can!

On our first day, we simply explored the city.  We went to Hallgrímskirkja, the largest church in Iceland and took some photos of the street art in the city, and explored nearby restaurants and shops.  It was interesting that one of Reykjavík’s neighborhood is named ‘Neigborhood of the Gods’ where the streets were named after the Gods of Norse mythology! There is an Odin street, Loki street (where Cafe Loki, a cafe with authentic Icelandic food), Freyja street and Thor of course!

DSC02412

The next day, we explored the Golden Circle. This includes the Thingvellir National Park. This park lies in a rift valley that marks the crest of the mid-atlantic ridge and the boundary between the North American tectonic plate and the eurasian plate.

IMG_6230

You can go to the park directly using a different route (from above the rift) but we followed the route from Oxararfoss (shown below).

oxarfoss

We continued on to the Geysir Hot Spring Area with boiling mud pits, exploding geysers and the lively Strokkur which spouts water 30 metres (100 ft) into the air every few minutes. It was fun to see Strokkur shot up water up the air but after you see it, there’s nothing else to do around here.

geysir

After taking a quick lunch break, we started our drive to see the majestic Gulfoss waterfall. The water plummets down 32 meters in two stages into a rugged canyon with walls that reach up to 70 meters in height (thanks Wikipedia!).  A lot of people consider this the most beautiful waterfalls in South Iceland. I don’t exactly agree. There’s a lot of areas you can view this waterfall. Because it’s so massive, you can decide not to go down near the falls and just take an aerial view from higher grounds.  I went down because why not(?) and took this shot.

gulfoss

Our next stop was Bruarfoss waterfall. This Iceland waterfall derives its name from a natural stone arch over the river and is considered the bluest waterfall in Iceland. This was a rare gem and if you ask me how we found it, I cannot possibly explain  (we were a bit lost too before we found it!) so I will link you to this blog which provides directions  to this amazing falls!

face falls

We had time to go to another waterfall before the day ends so we headed to Faxi waterfall. This one isn’t as popular  (or maybe because the weather was so gloomy that day) so there was a lot of good photo opportunities! Its a small waterfall compared to the rest we saw but definitely not less pretty.

DSC02604

Finally, the Kerio Crater.  By the time we reached the crater, we were literally freezing. The temperature just went down and its getting darker so we rushed to get our photo and drove back! You can actually walk down to the crater but I think the view is better from the top.

kerio

If you walk as fast as we do, and dont linger much beyond enjoying a few minutes of photo opportunities, all these can be done in a day.

On our second full day, we drove from Reykjavic to the city of Vik. This was mostly to cover the places we want to visit and not worry about driving back to Reykjavic.  In the morning, we went to Raufarhólshellir for a quick lava tunnel tour.  Since we do not have a lot of time, we did the Standard lava tunnel tour which only explores the outer mouth of the tunnel.  There is an extreme version of the tour and I would recommend that if you are a thrill seeker or if you have extra time in your hands.

IMG_5694

Afterwards, we continued on to Seljalandsfoss waterfall.  I liked that you can walk behind the falls and if you have wide-angle lens in your camera, you can definitely take a nicer photo of this magnificent falls from there.  Be prepared to cover up – the splashes from the falls will definitely get you wet! Also obviously the walk way is slippery so be careful!

behind

A few walks on the left of the Seljalandsfoss is this hidden gem… the Gljufrabui water falls. This is hidden between 2 rocks so from the outside, you will just see a glimpse but be adventurous  enough (you are in Iceland!!) and walk between the rock walls and you’ll have this view. I call this my ‘moneyshot’ view!

22366683_10155246336389132_3016541315209446572_n

Our next stop was the Skogafoss waterfall.  By this time we were already too tired and in no mood to walk and explore it further so basically we took some photos from afar and drove off. Also, after Gljufrabui, I wasnt so impressed with this one. If you are a fan of powerful waterfalls, I am pretty sure you will like this one though! There is a walkway to the side of the falls if you want to see it in a different angle.

IMG_5993

On our way to Vik, we stopped by the Sólheimasandur airplane wreckage.  I will let you find out how to get there yourself (lol). Fair warning – no cars are allowed to drive to the beach now so you have to walk to get there. Like a really, really, long.. walk. But hey, we got this pic afterwards so its worth it!

IMG_2992

We checked in at this great place that I got through Airbnb.  At the time, I was hopeful that the Northern Lights will make an appearance because it would’ve been amazing to take that photo with this background!

vik

Early the next morning, we headed to Reynisfjara Black Sand Beach. With its enormous basalt stacks, roaring Atlantic waves and stunning panoramas, Reynisfjara is widely considered to be the most beautiful example of Iceland’s black sand beaches.  Tourist buses start arriving at 10am so I’m glad we got there earlier! It was so cold and I was underdressed but hey fashion over comfort!

This slideshow requires JavaScript.

We added this one stop in our itinerary and I’ve got to tell you, the views were so unreal, I had to do a double-take. It really made me gasp out loud. Fjaðrárgljúfur is a canyon in South Iceland, with the Fjaðrá river flowing through it. .The canyon has steep walls and winding water and the most luscious green colors I have ever seen. You should definitely NOT miss this one.

IMG_3075 (1)

On our way to Hofn, we stopped by  Laufskálavarða which is a lava ridge, surrounded by stone cairns. All travellers crossing the desert of Mýrdalssandur for the first time were supposed to pile stones up to make a cairn, which would bring them good fortune on the journey. It’s a small area and with few parking available right beside the road so you cant miss it.

lava

Afterwards we did a quick stop at Skaftafell National Park to see the Svartifoss waterfall. This was such a disappointment for me because it appears there is only one place available to hikers to view this falls.  There is no access going down the base of the falls or above it..

DSC02777

Finally, we arrived at the Jokulsarlon Glacier Lagoon where we did a quick tour to explore the lagoon on a boat. The Jökulsárlón lagoon is right next to Vatnajökull, Europe’s largest glacier. Vatnajökull and its surrounding area is Iceland’s largest national park. During winter, there is a lot of activities available at the glacier including ice climbing!

DSC02872

The chunks of ice that fall into the lagoon slowly melt and drift out to sea, which is why the beach opposite the lagoon (split by a bridge) is called Diamond beach. The chunks of ice in the black sands of the beach literally look like glittering diamonds when hit by light. We arrived right on time for sunset so I was able to take the photo below.

diamond

We checked in at Hofn and this was when it got more exciting! We looked at the solar forecast and it appears the Northern Lights might appear around 11pm. We saw some faint lights around 9-10pm so we went out and started taking photos.  Its not as clear as I hoped it would be but for someone seeing this for the first time, it was still breathtaking.

northern lights

The next day we only planned to drive from Hofn back to Reykjavic for our Blue Lagoon appointment. However, because we didn’t get good pictures on some of the locations we  visited because the weather was funky (it literally changes from sunny to rainy in minutes and therefore the abundance of rainbows), we decided to stop by these locations to get better ones! 🙂

Finally, we arrived at the famed Blue Lagoon. In my opinion,  it is very commercialized and frankly, overrated. When we went, the lagoon was overflowing with tourists! There were lines and lines everywhere and it took a while to find a good picture where there’s not a bunch of people in the background! We stayed for an hour or so after we finished our drinks and our face masks (free with the package we selected) and hopped off the lagoon so I can get some business calls done (I KNOW).

22449610_10155251480199132_6375338840717995942_n

The next day was a very relaxing day for us around Reykjavic as we prepare for our flight back to the United States.  Jeannette made this trip so fun for me and there is a lot of memories I associate from this trip – there was the singing in the car (and me getting the lyrics messed up),  reminiscing about our shared audit work past, updates on our common friends and just all around having a great time! I do not mind traveling solo and I definitely enjoy it but with the right company, touring around a new country can be more fun!

I will be posting my travel guides related to this trip separately (damn, this is such a long post!). Until next time!!


The Sahara Desert Experience

I would’ve posted all 200+ photos of my one night stay at the Sahara Desert except I don’t want this post to just be all about the photos! It was that beautiful. One night made the long drive to Merzouga worth it.

sahara solo

There are a lot of desert camps scattered in the Sahara desert. I believe more than 30 camps are available for your choosing. Every tour operator in Morocco knows a camp you can sign up with. I chose Ali & Sara’s desert palace. They were pricier than other camps ($145) but the camp itself (as well as the experience) felt very luxurious!

A few days before the trip, I was provided a comprehensive information about the camp, including driving instructions to the meeting point, food options, what to expect, what is included, interactions with the camels and even a pamphlet about the Berber culture in general as well as basic words you should learn.

Because I was pressed for time, I only stayed for 1 night – this includes a sunset tour, dinner, berber music by the fire, sunrise tour, and breakfast before they drive me back to the meeting place.

We drove to Kasbah Le Berger, the meeting place where Muhamed, one of the staff from the Desert Palace picked me up to head to the camp.  I was very lucky that I happen to be the ONLY guest that night (yay!). I was told in NYE, the camp was actually full.

camp

We arrived right on time for the sunset tour. My camel, Casanova, (although Mubarak told me his name is Mohammed) was all ready for me! Muhamed set up my turban (that I got to keep afterwards!) and djellaba for use on my desert trip.

Finally, me, Mohammed and Mubarak were ready for our sunset trip!!

3

Mubarak speaks arabic and berber , understands french, spanish and conversational english and best of all…. an AMAZING PHOTOGRAPHER.  A lot of the photos I took obviously, the ones he took base on my instructions were amazing though and for a solo traveler like me, that was PRICELESS!

We went to Erg Chebbi dunes, found a comfortable spot and waited for the sunset.  It was breathtaking.

4

resting

After a while, all three of us trekked back to the camps.  I did mention it was a luxurious camp, right? This was my room!

26231519_10155472176709132_3811092374775312274_n

I cleaned up and then headed for the dining area.  By the way, the bathroom was outside my tent (just right beside it) complete with running heated water.  This was my birthday trip so when the staff was alerted it was my special day, they surprised me with a birthday cake and song (aww).

Normally the music is played outside infront of the fire but it was too cold and frankly I was eating too slow (there’s a lot of food for dinner!) so for an hour or more, they played berber music, danced and kept me company.

26195555_10155472183354132_5599122820178820726_n

The next morning, I met Mubarak at 6:20am for our sunrise camel ride.  We want to be in the dunes by the time the sun rises hence we had to leave that early.  That meant I had to wake up around 5am to shower, etc. but with this view, It was worth it!

yoga

You probably heard on the news that it snowed in the Sahara. I was lucky to be there when it happened. The part of the desert we were in didn’t get a lot of snow (which would’ve been awesome!) but the sand was covered with thin ice and some snow. Naturally, it was colder than usual so we had to build a fire.

5

fire

We took advantage of the beautiful lighting and took a LOT of photos!

2

When we returned at the camp, a hot breakfast was waiting for me. I saw there was a table above the camp and I requested to have my breakfast here and the team obliged. They were very accommodating about all the food and even asked me if I wanted something else. I was too busy stuffing my face to respond (lol).

breakfast

Afterwards, I packed, said goodbye to everyone and they drove me back to the hotel.

One night, and I have 200+ photos. Imagine if I stayed for another.  If you have more time than I do, I actually recommend it. You can have lunch with some nomads in the desert, ‘sandboard’, maybe cross to Algeria (kidding!), etc.  For me, one night was enough.

This experience was definitely one for the books and I highly recommend Ali & Sara’s desert palace. If you have the option to pick your camel handler, I also recommend Mubarak!

me and mubarak


Morocco travel tips

Going around Morocco –

As a solo traveler, it was easier for me to hire a private car and driver. You can find a lot of tour companies offer this option.  I used Desert Morocco . For 4 days, the fee is 110 euros per day. I negotiated it for $500. It covers fuel and toll fees, if any too.  This fee I believe is per day so if there’s 3 or 4 of you, you can split the cost. When we stop for coffee and lunch, I also offered to pay for my driver Abdellah’s food. It’s minimal anyway. Most of the tour companies actually quoted me $100 more which I do not think is reasonable at all.

You can also rent a car yourself when you get to the airport and drive around. It’s probably cheaper. Since I was traveling solo, this wasn’t ideal for me. However, maybe if I was traveling with a friend or 2 that would be my obvious choice.

There are buses between towns and cities too in case you want to take that route (Supratours bus). The trains can be late though especially in small towns, therefore can be a bit unreliable.

Your other option is to take the train. Train schedules can be found here (ONCF). The trains run often and they are rarely full. The easiest way to purchase tickets is in person. There is a first and second class seating on the train and the price difference between the two classes is minimal. I would suggest booking first class since you will be allocated a specific seat. So if you get in early, you can reserve a window seat!

Safety precautions for female solo travelers –

I actually felt safe the whole time I was in Morocco. However, everyone I met from my Airbnb host to my driver advised me to always keep my belongings where I can see them. I have a sling bag that I always kept in front of my body just to be safe.  Besides that, the rest is common sense.  Don’t walk in dark alleys, if you need to ask for directions, ask a woman or a store owner (preferably a woman). Driving at night, especially if you are driving yourself, is not advised in towns where some of the roads are not well lit.

Tips –

Tips are not required or expected. However, I think if you received an excellent service, you should give a tip.  There is no required percentage of purchase/service cost. I usually tip no more than 5 dirham for good food service.

Dress code –

I read before my trip that since Morocco is mostly a muslim country, you are expected to cover up your knees and shoulders. No cleavage or backless dresses obviously. I found that in Marrakesh and Fes, they are more lax on tourists.  In small towns, you can be stared at more and a few looks of disapproval.  I err to the side of caution and covered up my legs and shoulders. In the desert, they ask that you dress comfortably.  Knowing you will be riding a camel, I guess its safe to say short dresses (no matter how hot the weather is) is definitely inappropriate.

Language –

Most merchants and business establishments speak english, not fluent but understandable so there shouldn’t be any problem for us english speakers there.  They speak mostly arabic and french so I tried to learn some basic ones (eg. “shukraan” – thank you). I was told in the northern part of Morocco, they also speak spanish. In the desert everyone at the camp and some moroccans I’ve met in the mid-Atlas also speak Berber.


Exploring Morocco

First of all, Morocco wasn’t on my ‘list’ but when I saw a friend post pictures of her trip here, I immediately decided this country will be my 2018 birthday trip and boy was I very happy to pick this country! For reference, this trip was early January 2018 (winter).

From the onset, I was told I can skip Casablanca not because it doesn’t have much to offer but because what I was looking for (the medina, the beautiful mosques, the views) are really in Marrakesh.  As a Philippine passport holder, a visa is not required to enter Morocco so I wasn’t in a rush to book a flight.  I had the option to fly to Casablanca and then take the train to Marrakesh or fly straight to Marrakesh.  If you have the money and pressed for time, I suggest flying straight to Marrakesh.  The cost of flying to Marrakesh vs. Casablanca could be significant though. In my case, it was about $150 so I decided to fly to Casablanca and take the train (only cost around $50).

There are 2 direct flights from Washington (IAD) via Royal Air Maroc.  The one I took arrived in Casablanca around 9:30am.  From there, I found a currency exchange to get dirhams (Note: you cannot get this outside of Morocco unless you order from your bank in advance).  Keep the envelope and receipt so you can change back your dirhams to USD on your way back (although I saw some tourist just provide their boarding pass and passport).  You can also use the ATM which I was told provides better rates.

When you buy a train ticket, buy 2 tickets – one to Casa Voyageurs and from the Casa to Marrakesh.  You can get a second class ticket to the first one since its a short trip and get a first class ticket to Marrakesh. If you are pressed for time, buy the first ticket to L’Oasis which is the 2nd stop from the airport and then board the train to Marrakesh from there. It should save you an extra 20 minutes ;).

From Marrakesh station, it should be around 20-30 minutes to get to the heart of the city.  I scheduled a pick-up from my Airbnb host (70dh or $20) because I didn’t want to deal with negotiating with taxi drivers after a long, exhausting trip.

IMG_4962

The place I stayed with is called Cecile’s place which I found in Airbnb.  Cecile was not only very responsive (important for us Airbnb guests!) leading to the trip but she also answered any questions I had from logistics to tips in the city etc.  At 5:30pm, she prepared mint tea (always does) and shared it with us guests. The room itself was well worth the price for me but the main take away is her location.

From her place, you can literally walk to the Bahia Palace, Saadian Tombs, Jemaa El Fnaa square, the Souks, and the Koutoubia mosque and that’s exactly what I did.

I arrived around 4pm to her place and at that point, it was too late to visit the palace, tombs and other gardens I was planning to explore so I headed to Jemaa El Fnaa square for dinner.

IMG_5706

The square was filled with henna tattoo artists, snake charmers, juice and date stalls etc! It was very lively — and very touristy. A real tourist trap.  Be careful not to take your phone out and snap a pic of the snake – they will come for you, they will find you and they will make  you pay (lol). At dusk, various ‘magicians’, storytellers and musicians arrive at the square and most importantly — FOOD STALLS! The aroma of all those kebab, yummy and cheap!

Afterwards, I headed to the Souk which is only a few minutes walk from the square.  The souk is where bargain hunters thrive.  A good starting bid price for ANYTHING I would say is about 10% of the price they give you.  You can go up as you negotiate but I’d say pay for no more than 50-70% of the price.  They will offer you mint tea for free while they negotiate hard, other products you don’t need or want etc. like any bargain market so when you go, I suggest knowing exactly what you want to buy and how much you are willing to spend and stick to it otherwise you will end up with several rugs, silver teapots, knives and oil.

souk

It was raining so hard that day so I head home and started early the next day.

Bahia Palace opens at 9am. If you can get there exactly at 9am, you will have the whole palace for yourself for at least a few minutes and take pics like this!

IMG_5106

By 9:20, the Palace was full with tourist groups and tour guides.  Thankfully, I was out the door by 9:30.  The next stop was the Saadian tombs.  The entrance to the tomb is behind the mosque and there will be people in the entrance who will offer to tour you inside. There really isn’t much to see (its small) but you may want to hire a tour guide to explain to you the history of the tombs (I didn’t – I researched it myself ahead of time).

saadies

This was a very tight trip so we had to head to Kalaat M’Gouna (valley of the roses) right after lunch.  We stopped by Jardin Majorelle on our way out of Marrakesh.  This was definitely one place you cannot miss while you are in Marrakesh.  I only explored the gardens (70dh entrance fee, $20) but if you have time, I recommend going to the Yves Saint Laurent Museum right beside it (additional fee).  This place is in every tourist’ itinerary so its almost always full of people. It was very hard to take photos of the ‘villa’ alone.

IMG_5274

From Marrakesh to Kalaat M’Gouna through the High Atlas mountains was approximately 5 hours.  The drive was smooth and I definitely enjoyed the views! We stopped for coffee once and then another stop for a late lunch.

IMG_5494

The accommodation I booked at Kalaat M’Gouna through Airbnb is at Dar Timitar Kasbah.  This is definitely one of the best finds I’ve ever had through Airbnb.  The place was secluded, and very high up the mountain which provides amazing views of the valley.  It was winter so I didn’t get to see the valley bloom but I assume it would be very beautiful around April – May (the Rose festival in this valley is celebrated every May)!

IMG_5590

After breakfast, it was finally time to drive to the Sahara Desert. I will post that separately because there’s just a lot to talk about there. On the way, we drove to see Dades Gorge and Todra Gorge.  We did a quick stopover at a cafe on top of the road (you’ll know it when you see it!) which shows a very amazing view of the winding roads of Dades Gorge.

IMG_5627

A short drive further gave us this view!

IMG_5592

We proceeded to Todra Gorge and while the view was also good, I think if you are in a rush, you can skip this.

todra

From here, we drove for another 3 hours to reach the town of Merzouga where the Sahara tour starts. Here’s a preview picture of that tour:

IMG_5474

After a night in the desert, the next morning we drove to Fes through the Mid-Atlas mountains.  The plan was to stay the night at Fes and then drive the next morning to Casablanca for my flight back.  This was definitely the longest drive we did.  The first good view out of Merzouga was Azrou.  It was a quick stop on the road and I cannot believe how much different the landscape here is only 6 hours away from the desert! There’s horse rides (for a fee), but you can always take pictures with monkeys for free! Just watch out because the monkeys are known for snatching phones and cameras!

IMG_5574

Right after Azrou is a town called Ifrane. It’s a tiny town known for its alpine-style architecture and nearby ski slopes and forests. We did a quick stop for coffee.  It’s a nice, little town but I wasn’t impressed much.  Apparently, the  Ifrane National Park is beautiful with its Atlas Cedar trees but it was closed because of the weather.

We finally arrived at Fes around 7pm.  I was so tired from the drive that I went to sleep right after I put my bags down.  Some tourists actually start their trip at Fes (to the desert) instead of Marrakesh. I can understand that. In the morning, we drove by the medina and it was beautiful (the blue gate is pictured below).

IMG_5667

There is actually a place you can stop over that would give you a view of the whole medina. We stopped but I didn’t dare walk out in the rain (heavy downpour) with my camera.

After 3 hours, we finally arrived at Casablanca for my trip back, exchanged  my dirhams to USD and started the check-in process.  You better watch out here – they ask for your passport more than 5 times up to the departure gate, and they check your hand carry 3 times – the one right before the departure gate was very extensive.

All in all, I realized this trip couldve been better if I spent 8 days, instead of 5 which would give me an extra day to explore Fes, another one for a private hammam bath and tour the secret garden in Marrakech and maybe another one at the desert.  Add 2 more days if you want to go to the bright blue city of Chefchaouen.

I normally don’t repeat trips in countries I’ve been in but Morocco, so far, is the exception. I will not be opposed to going back to this beautiful country!


I used to love to blog – it was my own personal diary. However, I realized it became too private to share to the outside world. I haven’t had a chance or a reason to write until now.

Everyone wants to travel.  In fact, it has become too cliche to say “i love travelling” in your online dating profile because who doesn’t want to explore the world? There is liking the idea of traveling and actual traveling. I know in my heart I’ve always wanted to see the world but circumstances – whether personal, financial or emotional, made me procrastinate.

Once I started traveling though, I became sort of addicted.  It became my passion – to create a list of places I want to go, experiences I want to be part of, be lost in a completely different city. I started blocking long weekends for potential travel trips, adding a travel line in my monthly budget, and investing on camera, skills etc. to make my experience better.

One of the greatest obstacles I have to overcome is the idea of traveling solo.  What pushed me to do it is when I realized I cannot hold off my own travel plans, delay seeing the world just because there is no one I can go with.  Planning with friends and family create its own limitations. I realized that is not what I want my traveling experience to be so I created a compromise – I set a travel plan for myself and share it with friends, friends I do not mind travelling with. If they would like to join me, they are welcome to. In which case, we work together for an itinerary that works for both of us (hi Jeannette! hi Wendy!), and take the trip together. Somehow, it works and I am thankful.

Starting this year, I will document all my trips and if I can, I will also post prior trips that I took. I realized since I invested so much time researching and documenting  my experience through photos, I might as well share it with other travelers who  may benefit from my research.

So please enjoy and let me know what you think in the comments section!